
so i have always seen blogs with cool banners. never had any idea how to get one or make one, and i wasnt about to pay for some sort of program. well a friend found all the answers for me! she figured out a way to make a banner and use it on her blog...all for free! and it was easy. so this was my outcome: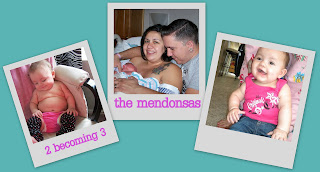 and this is my friends banner:
 and this is my friends banner:
and because her instructions were so easy, i thought id share my new-found knowledge with all 5 of you! plus this picasa program allows you to touch-up pictures (my new favorite thing to do!). so here are ashley's instructions-verbatim-i did add one thing thats in orange (why change what already works!):
-I use Picasa for all my photo editing. It's free - click here to download. It will search your computer for all your photos, you want this so you'll be able to use them.
-Go find a cute background for your blog- here or here have some great ones. Once that is on your blog, you are ready to make your banner.
-Open Picasa and highlight a few pictures that you want in your banner. Click 'Create Photo Collage' at the top of your folder. (one thing i noticed here was that if you are selecting pictures in different folders youll want to click on the little green thumbtack that is on the bottom left in the "selection" box; otherwise, as you select pictures in other folders, the previous ones will be unselected)
-When it pulls up your collage, make sure that 'Picture Pile' is selected in the top left corner under settings. I picked 'no border' for the pictures and a solid color for my background. You can also use an image for the background, if you want. Under Page Format I picked 'Custom' and typed in 650x 350 and made sure it was on landscape.
-Re-size, change the angle, and move your pictures where you want them to be. To add more pictures- Click the 'Clips' tab in the top left corner by Settings. Click 'Get more' to add or delete the pictures you want. You'll have to play around to figure out how to do everything, but it's pretty easy. Once you are done click 'Create Collage' under Settings. (Don't worry, you can come back and change things if you need to.)
-Under 'Projects' on the left you will see your banner. Click on it to open. Under 'Basic Fixes' there is a 'Text' button. Click that. Pick your font (downloaded ones will show up also), size, color, etc. You can make the text box larger or smaller the same way you did the pictures. You can also rotate it. You can add as many text boxes as you need. I used three.
-Get the words where you want them. If you need to move the pictures to fit with the words, just click 'Apply' on the left. At the top left, there is a button 'Edit Collage'. You can go back and forth from pictures to text until you get it right. {The text will not show up when you are arranging the pictures, but it is still there.}
-Once it's perfect, click the 'Export' button at the bottom in the middle. On 'Image Size' mine is on Re-size to 600. It worked, so I didn't mess with it.
-Go to your Blogger dashboard and click 'Layout'. At the top is the header. Click it and browse to find your new collage. Click 'Instead of title and description'. Click 'Save' and you're done!
well there you have it. i followed her directions to the T and ended up with a cool banner. and as you fiddle with picasa youll learn what its really capable of. if you have any issues or questions, let me know and ill see what i can do. if i dont know the answer ill find it for you! hope you find this helpful and fun!


No comments:
Post a Comment